Opus | Animation

Opus | Animation

Our senior trainer, Angie Taylor is a working animator, illustrator and motion graphic designer.

“it’s important for me to keep working at my day job – as well as being a training provider. About 50% of my work is training but I still take on a few creative jobs each year in order to test my skills and to develop new techniques. “

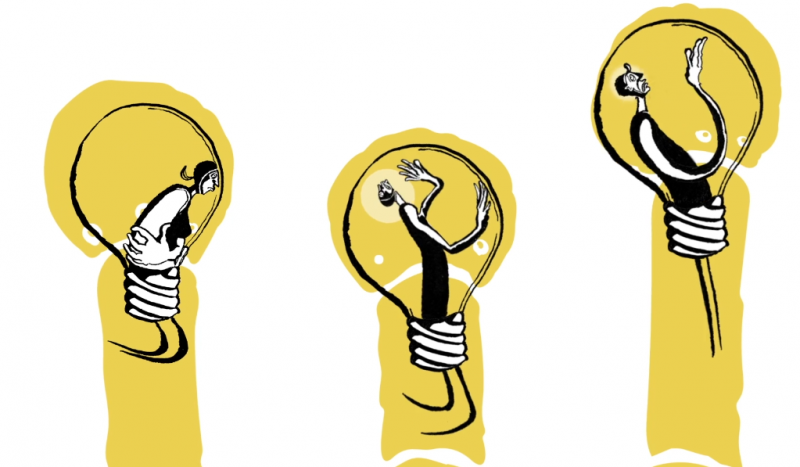
This animation was commisioned by Bright Marbles – a Silicon Valley company with an intruiging product, Opus. Opus is a product that uses artificial intellegence to help inventors to articulate and develop their products and ideas. Its a very difficult product to explain as it is quite unique.

“The company were looking for a new way to communicate the benefits of their product. They had previously used video of people talking about the product but felt that this was dull and did not get the concept of the product.

I directed and managed the project. I wanted a style of artwork that was loose, imaginative and humorous. So I decided to collaborate with illustrator, Belle Mellor on this project. I’ve worked with Belle before and I love the loose, freedom, humour and inventiveness of her work.

Together we brainstormed a few ideas, both sketching out a few core concepts. We then developed a script and storyboard based on the ideas becoming characters on a journey through a pipeline. Opus being the heroic, angelic character that helped the ideas on their journey from conception to final product production.

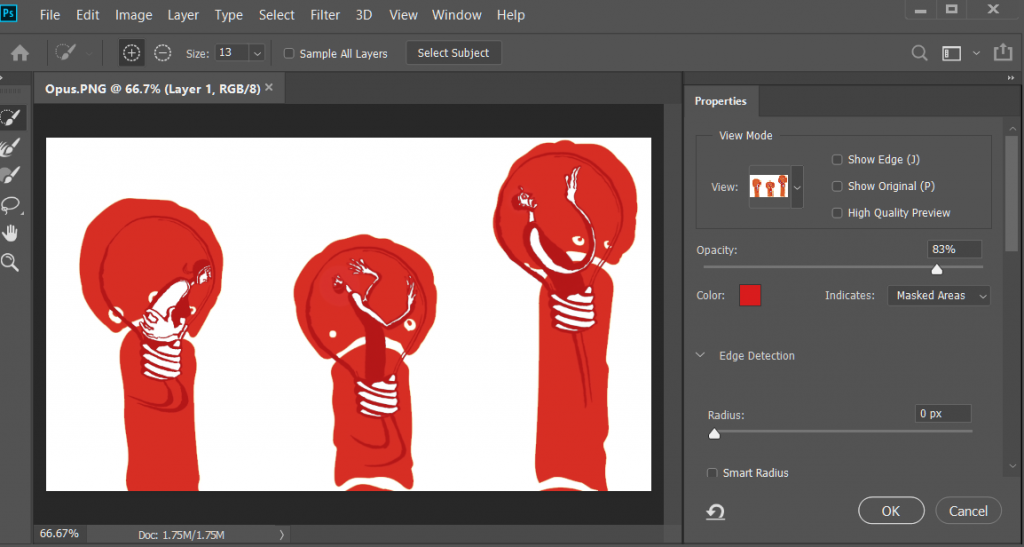
The first stage involved cleaning up the hand drawn images and splitting them into layers in Photoshop. Working out the correct scale of the images was an important factor. When you work in 3D, you tend to zoom in and out of the images. I had to ensure that all line work would look equal during the animation. It’s also important to remove any marks and backgrounds before animation takes place. I used Select and Mask and the Content-aware tools to adapt the drawings for this.

“I used Select & Mask in Photoshop to clean the layers, ready for animation in After Effects.”

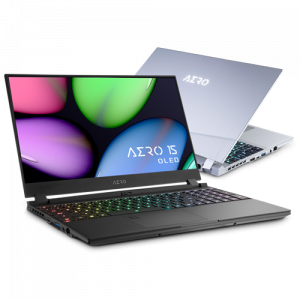
I built a 3D pipeline in MasterpieceVR, using my trusty HTC Vive headset. I created the entire project on my Gigabyte Aero laptop. It’s a powerful beast with an on board NVIDIA® GeForce® GTX 1070 which coped admirably with all the VR and 3D rendering I threw at it.

This was all imported into Cinema 4D where I used the Sketch and Toon features to match Belle’s hand-drawn look & feel. I then imported the Cinema 4D file into After Effects via the Cineware plugin. In After Effects I composited Belle’s drawings and 2D stop-frame animations into the 3D scene. I also added some of my own animations here, animating some of the characters using the Rubberhose scripts and taking advantage of After Effects new Master properties to help make the complicated structure easier to manage. There’s a tutorial on Master Properties in my course about Rubberhose animation in After Effects here.

I then brought in musician, Lucy Edwards to help with the music. Together we came up with a humourous melody. Lucy played all the parts on my Roland W30 keyboard. I edited and produced it in Apple’s Garageband. I then added a few sound effects in Adobe Audition. I edited the Audio and the Sound effects to the animation in Adobe Premiere Pro. I found that the the Auto-ducking features to make this process failry quick and easy. The final voiceover was added at this satge so that it fitted the animation perfectly.”

You can find out more about Opus – the revolutionary IP Virtual Assistant here.

If you want to learn how to do any of the things mentioned in this article you can book Angie for one-to-one training at Creative Cabin. We run bespoke courses for all types of creative professionals. These courses can be booked at the Creative cabin studio, or can be done remotely via Adobe Connect.

After Effects training

After Effects training

After Effects Training

Our remote, online After Effects training courses are taught by motion graphics expert, Angie Taylor – a motion graphic designer, author and illustrator with 25 years industry experience. Choose from our standard two-day After Effects training courses – all taught on a 1-2-1 basis. Or pick and mix modules from below to make up your own bespoke course.

You can choose from Beginners, Intermediate or Advanced courses in Photoshop. Or, pick and mix modules  to make up your own bespoke course. We offer remote, online training for individuals and groups.

Customer Reviews

Want to hear what our customers think of our courses? You can read reviews about our training courses here.

What we cover in our After Effects training

There are four levels of After Effects training available as well as custom courses. You can find example outlines of these courses by clicking on these links. Each of these is a 2 day course

How does the training work?

Angie will send you an evaluation form that takes a few minutes to complete. This will give Angie an indication of the level of After Effects training you require. She will customise the course to fit your own personal needs. Evaluation form example

Your Instructor - Angie Taylor

All courses are taught by artist, Angie Taylor. Angie worked as a motion graphic designer for over 25 years.

She was a demo artist for Adobe and is an Adobe Community Professional. You can see examples of Angie's work here on her portfolio.

Angie is a lecturer at the Univeristy of Brighton. She has taught children and adults at several colleges, schools and universities.

Angie has several books & courses  published on design & animation.

fundamental-after-effects

Getting comfortable in After Effects
  • An overview of the After Effects interface
  • Making use of task focussed workspaces
  • Customising the application preferences
  • Project settings you need to know about
  • Creating composition settings presets
  • Useful, advanced composition settings
Importing Images into After Effects
  • Supported image types in After Effects
  • Working with Photoshop files in After Effects
  • Working with Illustrator files in After Effects
  • Importing or creating image sequences
Working with video footage in After Effects
  • Supported video formats in After Effects
  • How After Effects works with aspect ratios
  • Adjusting video frame rates and looping footage
  • Understanding video compression and codecs
  • Working with interlaced footage and field order
Timing and motion graphics
  • Importing Premiere Pro animatic via Dynamic Link
  • Adding comp or layer markers in After Effects
  • Making motion graphics dynamic with sound effects
  • Animating elements in time with music
Mastering the five transform properties
  • Rotation
  • Scale
  • Position
  • Anchor Point
  • Opacity
  • Working with 3D in a 2D environment
Applying Effects
  • Adding video effects layers (Blurs, Color correction etc)
  • Applying effects to solids (Generator effects)
  • Creating backgrounds (Fractal noise, patterns, textures)
  • Using Adjustment Layers to apply effects to multiple layers
  • Applying shadows and bevels with Layer Styles
  • Masking effects to isolated areas
Panels
  • Essential Graphics
  • Motion Sketch
  • Smoother
  • Wiggler
  • Mask interpolation
Previewing your work
  • Customising the Time control options
  • Setting up a disk cache (purging)
  • Composition panel options (fast previews, region of interest, resolution, draft options, masks, channels, view options)
  • Timeline controls (shortcuts, view area, zooming, navigating, panels)
Keyframe Assistants
  • When to use Easy Ease and when to use Continuous Bezier
  • Time-reversing keyframes and animations
  • Fixing acceleration issues with Exponential Scale.
  • Understanding keyframe interpolation
  • Auto orient rotation options.
2 day course

Intermediate After Effects

Color and channels
  • RGB, HLS and other color systems
  • Using RGB channels for color adjustment
  • Compositing images with alpha channels
  • Color spaces & color management in After Effects
Presets & Templates
  • Building a comprehensive preset library
  • Using Essential Graphics panel to create Templates
  • Working with Master Properties
Spatial Animation
  • Creating motion paths
  • Adding or removing path keyframes (drawing paths)
  • Four basic keyframe types (Linear, Auto Bezier, Continuous Bezier, Bezier)
  • Using Hold keyframes to animate sudden changes
  • Using Auto Orient to automatically rotate objects along paths.
  • Recording mouse movements with Motion Sketch
  • Creating randomness with the Wiggler
  • Physics (Balance, gravity, bounce etc)
  • Applying squash and stretch to animation
Temporal Animation
  • Adjusting timing in the Timeline (Keyframe interpolation, keyframe velocity)
  • Four basic keyframe types (Linear, Auto Bezier, Continuous Bezier, Bezier)
  • Viewing speed and value graphs in the graph editor
  • Roving Keyframes in time to even out speed changes
  • Retiming animations in the keyframe view (Alt-click and drag)
  • Matching keyframes between properties to avoid glitches (scale and position)
  • Creating overlapping actions
  • Going past the pose to create dynamism
  • Smoother
Shape Layers
  • Primitive vector shapes
  • Drawing custom vector shapes
  • Fills and strokes
  • Combining shapes
  • Shape operators
  • When to use multiple layers
  • Converting shapes from other applications
Text Layers
  • Character panel
  • Paragraph panel
  • Source text property
  • Arranging text along a path
  • adding text animator properties
  • The range selector
  • The wiggly selector
Working in the Layer Panel
  • Spotting Interlacing issues and other errors
  • Trimming footage in the Layer panel
  • Best practices for Ken Burns effects (Panning and Zooming)
  • Viewing effect paths and controls in the Layer panel
  • Working with multiple viewers
Grouping
  • Parenting
  • Nesting
  • Precomposing
  • Collapsing Transformations
  • Layer and render order
2 day course

Advanced After Effects - day 1

Expressions
  • Rotation linking
  • Working with 2D properties
  • Wiggle
  • Looping
  • Audio control
  • Expression controls
  • Rigging
Keying and Compositing
  • Using masks to isolate areas
  • Auto-tracing images and movies
  • Rotoscoping footage with the Rotobrush
  • Keying out green screen with the Keylight effect
  • Creating transparent keys with the Color Difference effect
  • Matte Correction technique
  • Auto-tracing movies or images
Working with the Graph Editor
  • Understanding the speed graph
  • Animating dimensions individually with the Value Graph
  • Tips tricks and techniques with the Graph editor
RGB images and channel effects
  • Blending modes
  • Mattes and Matte effects
  • Alpha channels
  • Channel effects
  • 32-bit/ linear workflows
Combining Effects
  • Procedural V’s non-procedural effects
  • Creating Fire/smoke/water with Turbulent Noise
  • Saving effect presets
  • Adding color to effects or layers
  • Distorting surfaces with turbulent displace
  • Effects that refer to other layers (Displacement maps etc)
Character Animation techniques
  • Forward Kinematic animation with layers
  • IK animation
  • Puppet Tool
  • Character Animator

Power User

Contact us for details

Advanced After Effects - day 2

3D 
  • 3D properties
  • Working with the 3D view menus
  • Navigating custom views with the Camera tools
  • Controlling the Axis modes
  • Cinema 4D Renderer
  • Extruding and bending layers
Cameras
  • Basic camera properties
  • Using the camera tools to adjust or animate the Active camera
  • Manually adjusting using position and point of Interest and orientation
  • Using nulls
  • Zoom
  • Depth of Field
  • Keyframing cameras
  • Auto-orient options
Lights
  • Basic Light properties
  • Light types
  • Material Options
  • Shadows
Cinema 4D Lite and Cineware
  • Importing a 3D object into your comp
  • Adjusting the render settings of cineware
  • Editing the file in Cineware
  • Cineware and After Effects cameras
  • Creating a new 3D object for your comp
  • Multipass compositing
Tracking
  • Masks
  • Layer Tracking
  • Camera Tracking
  • Mocha AE
  • Capturing camera moves from a GoPro
Rendering and Distribution
  • Image sequences versus movies
  • Adobe Media Encoder
  • The Render Queue
  • Render Settings
  • Output Modules
  • Templates
  • Watched folders
2 day course
After Effects & Character Animator training | Summer 2018

After Effects & Character Animator training | Summer 2018

Mel Jennings | motion graphic designer

I highly recommend the Creative Cabin for Adobe After effects training. Angie is extremely knowledgeable, a great tutor and lovely person.

After completing the two day After Effects training course (fundamentals), I felt confident to jump into creating projects back at work.

The 1:1 nature of the training meant Angie tailored the training to our business needs which was superb and helped build my skills and confidence when I got back to the office.

Angie’s knowledge and flair were super inspiring. She’s super helpful and offers lots of tips and tricks.

Totally recommend training at the Creative Cabin! I hope to plan another trip to extend my skills.

After Effects training in Brighton

After Effects training in Brighton

Adobe After Effects with Angie Taylor

Please Contact Us to find out about Angie’s next After Effects course and book your place.

Here are some of the things you’ll learn

  • How to control timing and adjust values with the graph editor
  • Tips to help visual artists manually draw key frames in the Timeline
  • All the different interpolation types in After Effects
  • How to use the rules of animation to create compelling animation
  • How to demystify effects and make sense of them
  • How to convert vector artwork into animated shapes for infographics
  • Create 3D per-character animation directly in After Effects using the Cinema 4D Renderer
  • Build your own valuable library of custom presets and templates.

About your trainer

Angie Taylor is a motion graphic designer with 25 years experience in the film and TV industry. She’s a Lynda.com author and an Adobe Community Professional. Angie has presented seminars at conferences worldwide including After Effects World, Macworld, NAB, IBC, BVE, Reasonsto, Flash on the Beach and FMX. Angie has worked as a demo artist for Apple, Adobe and MAXON

After Effects tips

Here’s my latest collection of After Effects Twitter Tips from the Creative Cabin archive.

Learn all sorts of useful tips and tricks in bite sized portions. Make sure to Follow us on Twitter to get even more of these tips regularly as well as other goodies welike to share.

  1. AFTER EFFECTS TIP | To make a one node camera point at a layer, select the layer, then with the unified camera tool selected, hit the F key
  2. AFTER EFFECTS TIP | Copy & Paste any mask shape into a position property to make layer move along the path. Click on property name to select
  3. AFTER EFFECTS TIP | Give Adobe your feedback | Report Feature Requests & bugs here; http://t.co/s7f1NOPs @AdobeAE #AfterEffects
  4. AFTER EFFECTS TIP | To stretch or squash an animation – select all keyframes – hold Alt key & drag first or last Keyframe in selected group
  5. AFTER EFFECTS TIP: Video tutorial – Use the Stroke effect on Illustrator paths to make handwriting animate on screen http://t.co/0E6UHcKOsr
  6. AFTER EFFECTS TIP: How to make a layer follow a path copied from Adobe Illustrator artwork. http://fb.me/CEapjgCw
  7. AFTER EFFECTS TIP: add new Refine Matte effect to ANY matte in AE to refine edges or add motion blur. Not just for Rotobrush! Fabulous tool!
  8. AFTER EFFECTS TIP: Animating characters, use expression pickwhip 2 link body parts 2 cntrl layer. Expression control effect 4 each movement.
  9. AFTER EFFECTS TIP: How to make a layer follow a path copied from Adobe Illustrator artwork; http://bit.ly/f8tP4w
  10. AFTER EFFECTS TIP: Lay down markers in time with audio by previewing the audio and hitting * on number pad when you want markers to appear.
  11. AFTER EFFECTS TIP: to edit the path of an effect’s positional property (e.g. Particles) got to Layer panel & choose effect in target menu.
  12. AFTER EFFECTS TIP: To use more than one layer as matte without precomping. Add multiple copies of Sett Matte effect to layer needing matted.
  13. AFTER EFFECTS TIP: @butlerm_com Try combining transfer modes, use more than one layer with a different mode and opacity value on each! 🙂
  14. AFTER EFFECTS TIP: Add keyframes for hidden Transform properties by selecting layers & hitting alt & property letter (eg alt-p for position)
  15. AFTER EFFECTS TIP: Applied a preset & wanna find out how it’s made? Select layers then double-hit the U key to expose adjusted properties.
  16. AFTER EFFECTS TIP: Make 3D layers turn to face camera as it moves. Select layers, go to Layer>Transform>Auto Orient. choose Towards Camera
  17. AFTER EFFECTS TIP: Right-click on a property value to open Edit Value dialog. Here u can access different measurement units & adjust ranges.
  18. #AfterEffects Tip | Rotate , scale, skew or move all layers by adding the Transform effect to Adjustment layer – keyframe to animate them
  19. #AfterEffects Tip | Scaled a layer down, nested the comp, then scaled it up? Click Collapse Transformations switch to fix resolution issues.
  20. #AfterEffects Tip | Travis Wade presents his After Effects: Copy and Paste Shortcuts on Motionworks; http://t.co/nP2yA1nJ
  21. #AfterEffects Tip Make layer automatically turn to follow direction of path – select layer, go to Layer > Auto Orient. Choose ‘Along Path’
  22. #AfterEffects Tip | Isolate a property group from the Effect Control Panel in Timeline by double-clicking Property Group name in ECW
  23. #AfterEffects Tip | Do you have trouble with slow render speeds? Here’s a video workshop by Todd Kopriva to help: http://t.co/Y45ucGEl
  24. #AfterEffects Tip: Do you have trouble with slow render speeds? Here’s a video workshop by Todd Kopriva to… http://t.co/2fL7wE8l
  25. #AfterEffects Tip – Scale layers in comp without messing up composition – Select layers – Go to File > Scripts > Scale Selected Layers
  26. #AfterEffects Tip | @Doguib7 Create a Shape Layer, use Offset Paths & Trim Paths from Shape Layer ‘s “Add” menu to animate paths – lotsofun!
  27. #AfterEffects Tip | Animate property randomly – Alt-click Stopwatch to add expression. Type Wiggle(10,50) to change value 10 p/sec within 50
  28. #AfterEffects Tip | Audio file plays at different speed than recorded? Check that RAM preview settings match the frame rate of the audio.
  29. #AfterEffects TIP | Custom Shape layers – 1 Layer > New Shape Layer 2 Draw path with pen 3 Select path property – paste custom path @Doguib7
  30. #AfterEffects Tip | Drag comps directly to Adobe Media Encoder to render in background. Allows you to continue working on other comps in AE
  31. #AfterEffects Tip | Loop Footage – select clip, go to Interpret Footage > Main > Other Options > Choose how many time you want to loop 🙂
  32. #AfterEffects Tip | Quickly deselect selected items by hitting F2. On Mac make sure to use Fn key to override system shortcuts.
  33. #AfterEffects Tip | Replace layer in Timeline with footage from Project panel (retaining fx + KFs) – Select both, hit Cmmd+Alt+/ Ctrl+Alt+/
  34. #AFTEREFFECTS TIP | Rubbish at animating? Don’t worry! Use the Motion Sketch panel to record mouse or pen motion & apply it to your layer 🙂
  35. #AfterEffects Tip | Video Tutorial – how to make your own “Old Film” effect using Turbulent Noise; http://t.co/IOn0bHVPuU @AdobeAE #Mograph
  36. #AfterEffects Tip | Video tutorial – Use the Stroke effect on Illustrator paths to make handwriting animate on screen http://t.co/APabrfE9FT
  37. #AFTEREFFECTS Tip 41: RT @i2cblog: In Project panel, search ‘unused’ or ‘missing’ to see what’s not used in any comp or source is missing
  38. #AfterEffects tip; Moving project to other machine or archiving? File > Collect Files gathers all source footage & project maintaining links
  39. #AfterEffects tip; Scale layers or comps without messing up composition. Go to File > Scripts > Demo palette. Use Scale Layers
  40. #AfterEffects Tip; Use Premiere Pro to cut footage, add simple animation to layers in real time. Dynamic Link portions to AE for finessing
  41. #AfterEffects Tip: @Franckmax If you want to do that, just Toggle hold the keyframe first, then right-click and choose “Easy Ease Out/In” 🙂
  42. #AfterEffects tip: @jamesboorman To make the particles stay “alive” for longer, adjust the Lifespan property.
  43. #AfterEffects Tip: @MarkToddWagon No need for Alt, Page Up & Down on their own works. Home & End key to move to 1st & last frames of comp.
  44. #AfterEffects Tip: 3D layers have Material Options to control shadows. Cast Shadows & Accept Shadows can be switched on or off per layer.
  45. #AFTEREFFECTS tip: Animate Source Text property 2 make words change over time in text layer. Font & character panel attributes also animated
  46. #AfterEffects tip: Convert Text to Shape layers (Layer > Create shapes from Text) – Add cool Shape properties to get creative! Endless Fun!
  47. #aftereffects tip: Create a keyframe for a property on selected layers by holding alt key & tapping property shortcut. P for Position etc
  48. #AfterEffects Tip: Even out animation speed – select Keyframes in timeline (except 1st & last KF). Right-click & choose “Rove Across Time”
  49. #AfterEffects Tip: Found a camera move or lighting setup you like? Remember you can save them as Animation Presets to use in other comps.
  50. #AfterEffects Tip: Give footage instant punch & contrast – duplicate layer – make top layer Overlay Blend mode – adjust Opacity to taste 🙂
  51. #AfterEffects Tip: Have layers in comp that you don’t want to render? Select Layer, go to Layer > Guide Layer to create non-rendering layer.
  52. #AfterEffects tip: Help with custom shatter maps. Re: Is this done with shatter effect? http://cr8v.co/wCe [Like it? http://bit.ly/lRPIGH ]
  53. #aftereffects tip: Huge files? Slow render times? Select layer in Project, go 2 File > Create Proxy. Makes linked low res version of file!
  54. #AfterEffects tip: Jump back & forth between visible keyframes & layer markers by hitting J & K. Trouble remembering? Think JUMP KEYFRAMES!
  55. #AfterEffects Tip: Learn Cinema 4D – soon – you won’t regret it! 🙂 @maxon3d @AdobeAE #Mograph @c4dtips
  56. #AfterEffects Tip: Locate missing footage by typing ‘missing’ in2 search field in Project panel. Relink by double-clicking it & relocating
  57. #AfterEffects Tip: Metric Kerning looks good on well-designed, classic fonts for broadcast – it includes a little more space than Optical
  58. #AfterEffects tip: Painting in Layer panel. Go to View > New View. Place comp & layer panels side by side. Lock them for nice ETLAT workflow
  59. #AfterEffects Tip: Pt 2. Select Camera, double-hit U key to expose adjusted properties, drag select them, drop into Effects & Presets panel
  60. #aftereffects tip: Remember the shortcuts for properties with the word ‘STRAP’. (S)cale, Opaci(T)y, (R)otation, (A)nchor Point, (P)osition
  61. #AfterEffects tip: Rendering more than one format? Select Render Item, go to Composition > Add Output Module to render once & format twice
  62. #AfterEffects Tip: Rendering movie for web? Choose poster frame displayed in thumbnail – Go to Composition > Set Poster Time before render.
  63. #AFTEREFFECTS Tip: Retime animation – select keyframes – hold Alt key & drag 1st or last keyframe. Keeps relative timing intact.
  64. #AfterEffects Tip: RT @theangietaylor: Re: After Effects Key Light – Some Spilling Occuring – How Do I Get Rid of it? http://t.co/azVs5mxn
  65. #AfterEffects Tip: RT @theangietaylor: Re: Moving Layers by n Pixels http://t.co/qtde4cIk
  66. #AfterEffects Tip: Select a layer, double-hit U key to expose properties adjusted from default state. Great way to understand effect presets
  67. #aftereffects tip: To auto-animate brush strokes as they’re drawn. Choose Paint tool & select ‘Write On’ in Duration Menu in Paint panel.
  68. #AfterEffects Tip: To create a template project simply save the project with .aet instead of .aep. Prevents u from accidentally over-writing
  69. #AfterEffects tip: To reduce the amount of motion blur in a comp go 2 Composition Settings > Advanced Tab & reduce the Shutter Angle value.
  70. #AfterEffects tip: To use included scripts enable General > Preference to ‘Allow scripts . . .’ and then restart… http://fb.me/BQbXk95K
  71. #AfterEffects Tip: Use Motion Sketch panel to capture motion from Wacom tablet & apply it to layers. Good way to record gestural animation.
  72. #AfterEffects Tip: Use the J & K keys to jump between visible keyframes
  73. #AfterEffects Tip: Use the “continue” Loop expression 2 continue an existing animation, maintaining speed &… http://t.co/u21TqofD
  74. #AfterEffects Tip: When overnight rendering, render out an image sequence, at least then if it crashes you can save frames already rendered.
  75. #AfterEffects tips from @AngieTaylor – Software Tips & Tricks Newsletter – http://t.co/kEF6ry0p [Like it? http://t.co/IzVYju0W ]